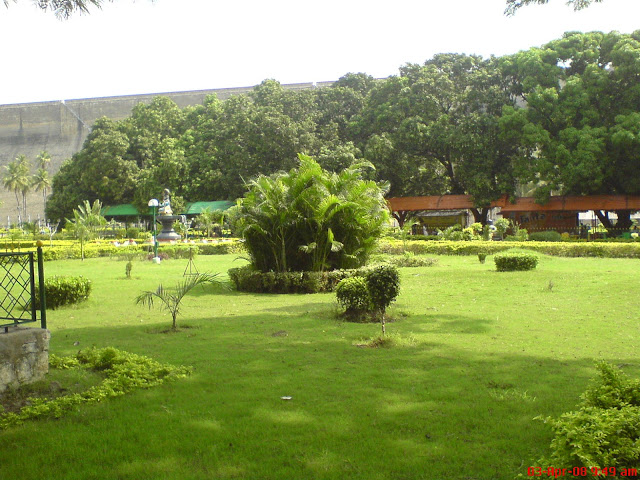
On 14-11-2023: 58.15/120 அடி/Feet
Inflow: 8,424 கன அடி/Cusecs
Outflow: 252 கன அடி/Cusecs
Available Water: 23.327/93.47 T.M.C
Water Level: Increasing
 
கட்ட துவங்கிய நாள்: 20.071925
கட்டி முடித்த நாள்: 21.08.1934
கட்டி முடிக்க ஆன செலவு : ரூ.4.80 கோடி
கொள்ளளவு: 93.50 டி.எம்.சி
அதிகபட்ச உயரம்: 214 அடி
அதிகபட்ச அகலம்: 171 கீ.மீ 
சேமிப்பு உயரம்: 120 அடி
நீர்ப்பிடிப்பு பரப்பளவு: 59.25 சதுர மைல்
1 Cusecs=28.317 Liters Per Second
1 T.M.C=28,316,846,592 Liters
மரம் வளர்ப்போம்...!!! மழை பெறுவோம்...!!!

Tuesday 5 June 2018

Methods of Rainwater Harvesting | How to Save Rain Water

4 comments
Methods of Rainwater Harvesting

mettur dam water harvestingsystem
Save Rain Water


rain water harvesting methods and tricks
Save Rain Water

Broadly there are two ways of harvesting rainwater
  1. Surface runoff harvesting
  2. Roof top rainwater harvesting
Rainwater harvesting is the collection and storage of rainwater for reuse on-site, rather than allowing it to run off. These stored waters are used for various purposes such as gardening, irrigation etc. Various methods of rainwater harvesting are described in this section.

1. Surface runoff harvesting

In urban area rainwater flows away as surface runoff. This runoff could be caught and used for recharging aquifers by adopting appropriate methods.

2. Rooftop rainwater harvesting

It is a system of catching rainwater where it falls. In rooftop harvesting, the roof becomes the catchments, and the rainwater is collected from the roof of the house/building. It can either be stored in a tank or diverted to artificial recharge system. This method is less expensive and very effective and if implemented properly helps in augmenting the groundwater level of the area.

Rooftop Rainwater Harvesting System

Components of the Rooftop Rainwater Harvesting

The illustrative design of the basic components of roof top rainwater harvesting system is given in the typical schematic diagram shown in Fig 1.

best rain water harvesting methods and technique
Fig 1: Components of Rainwater Harvesting

The system mainly constitutes of following sub components:
  • Catchments
  • Transportation
  • First flush
  • Filter
Catchments

The surface that receives rainfall directly is the catchment of rainwater harvesting system. It may be terrace, courtyard, or paved or unpaved open ground. The terrace may be flat RCC/stone roof or sloping roof. Therefore the catchment is the area, which actually contributes rainwater to the harvesting system.

Transportation

Rainwater from rooftop should be carried through down take water pipes or drains to storage/harvesting system. Water pipes should be UV resistant (ISI HDPE/PVC pipes) of required capacity. Water from sloping roofs could be caught through gutters and down take pipe. At terraces, mouth of the each drain should have wire mesh to restrict floating material.

First Flush

First flush is a device used to flush off the water received in first shower. The first shower of rains needs to be flushed-off to avoid contaminating storable/rechargeable water by the probable contaminants of the atmosphere and the catchment roof. It will also help in cleaning of silt and other material deposited on roof during dry seasons Provisions of first rain separator should be made at outlet of each drainpipe.

Filter

There is always some skepticism regarding Roof Top Rainwater Harvesting since doubts are raised that rainwater may contaminate groundwater. There is remote possibility of this fear coming true if proper filter mechanism is not adopted.

Secondly all care must be taken to see that underground sewer drains are not punctured and no leakage is taking place in close vicinity.


Filters are used for treatment of water to effectively remove turbidity, colour and microorganisms. After first flushing of rainfall, water should pass through filters. A gravel, sand and ‘netlon’ mesh filter is designed and placed on top of the storage tank. This filter is very important in keeping the rainwater in the storage tank clean. It removes silt, dust, leaves and other organic matter from entering the storage tank.

The filter media should be cleaned daily after every rainfall event. Clogged filters prevent rainwater from easily entering the storage tank and the filter may overflow. The sand or gravel media should be taken out and washed before it is replaced in the filter.

A typical photograph of filter is shown in Fig 2.
how to save rain water during raining season
Fig 2: Photograph of Typical Filter in Rainwater Harvesting

There are different types of filters in practice, but basic function is to purify water. Different types of filters are described in this section.

Sand Gravel Filter

These are commonly used filters, constructed by brick masonry and filleted by pebbles, gravel, and sand as shown in the figure. Each layer should be separated by wire mesh. A typical figure of Sand Gravel Filter is shown in Fig 3.
use of rain water harvesting methods
Fig 3: Sand Gravel Filter

Charcoal Filter

Charcoal filter can be made in-situ or in a drum. Pebbles, gravel, sand and charcoal as shown in the figure should fill the drum or chamber. Each layer should be separated by wire mesh. Thin layer of charcoal is used to absorb odor if any. A schematic diagram of Charcoal filter is indicated in Fig 4.
tamilnadu rain water harvesting systems and funds
Fig 4: Charcoal Filter

PVC –Pipe filter

This filter can be made by PVC pipe of 1 to 1.20 m length; Diameter of pipe depends on the area of roof. Six inches dia. pipe is enough for a 1500 Sq. Ft. roof and 8 inches dia. pipe should be used for roofs more than 1500 Sq. Ft. Pipe is divided into three compartments by wire mesh.

Each component should be filled with gravel and sand alternatively as shown in the figure. A layer of charcoal could also be inserted between two layers. Both ends of filter should have reduce of required size to connect inlet and outlet. This filter could be placed horizontally or vertically in the system. A schematic pipe filter is shown in Fig 5.
india rain water harvesting management schemes
Fig 5: PVC-Pipe filter

Sponge Filter

It is a simple filter made from PVC drum having a layer of sponge in the middle of drum. It is the easiest and cheapest form filter, suitable for residential units. A typical figure of sponge filter is shown in Fig 6.
save rain water by rain water harvesting methods
Fig 6: Sponge Filter

Methods of Rooftop Rainwater Harvesting

Various methods of using roof top rainwater harvesting are illustrated in this section.

a) Storage of Direct Use

In this method rainwater collected from the roof of the building is diverted to a storage tank. The storage tank has to be designed according to the water requirements, rainfall and catchment availability.

Each drainpipe should have mesh filter at mouth and first flush device followed by filtration system before connecting to the storage tank. It is advisable that each tank should have excess water over flow system.

Excess water could be diverted to recharge system. Water from storage tank can be used for secondary purposes such as washing and gardening etc. This is the most cost effective way of rainwater harvesting.

The main advantage of collecting and using the rainwater during rainy season is not only to save water from conventional sources, but also to save energy incurred on transportation and distribution of water at the doorstep. This also conserves groundwater, if it is being extracted to meet the demand when rains are on. A typical fig of storage tank is shown in Fig 7.
rain water harvesting hd images and video examples
Fig 7: A storage tank on a platform painted white


b) Recharging groundwater aquifers

Groundwater aquifers can be recharged by various kinds of structures to ensure percolation of rainwater in the ground instead of draining away from the surface. Commonly used recharging methods are:-

a) Recharging of bore wells

b) Recharging of dug wells.

c) Recharge pits

d) Recharge Trenches

e) Soakaways or Recharge Shafts

f) Percolation Tanks

c) Recharging of bore wells

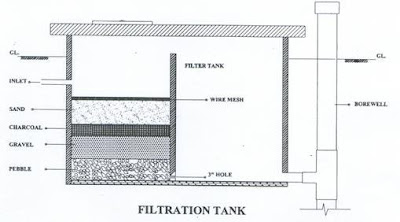
Rainwater collected from rooftop of the building is diverted through drainpipes to settlement or filtration tank. After settlement filtered water is diverted to bore wells to recharge deep aquifers. Abandoned bore wells can also be used for recharge.

Optimum capacity of settlement tank/filtration tank can be designed on the basis of area of catchment, intensity of rainfall and recharge rate. While recharging, entry of floating matter and silt should be restricted because it may clog the recharge structure.

First one or two shower should be flushed out through rain separator to avoid contamination. A schematic diagram of filtration tank recharging to bore well is indicated in Fig 8 .
how to measure rain water harvesting quadity
Fig 8 :Filtration tank recharging to bore well

d) Recharge pits

Recharge pits are small pits of any shape rectangular, square or circular, contracted with brick or stone masonry wall with weep hole at regular intervals. Top of pit can be covered with perforated covers. Bottom of pit should be filled with filter media.

The capacity of the pit can be designed on the basis of catchment area, rainfall intensity and recharge rate of soil. Usually the dimensions of the pit may be of 1 to 2 m width and 2 to 3 m deep depending on the depth of pervious strata.

These pits are suitable for recharging of shallow aquifers, and small houses. A schematic diagram of recharge pit is shown in Fig 9.
tamilnadu rain water saving schemes and funds
Fig 9: Recharge pit

e) Soakway or Recharge shafts

Soak away or recharge shafts are provided where upper layer of soil is alluvial or less pervious. These are bored hole of 30 cm dia. up to 10 to 15 m deep, depending on depth of pervious layer. Bore should be lined with slotted/perforated PVC/MS pipe to prevent collapse of the vertical sides.

At the top of soak away required size sump is constructed to retain runoff before the filters through soak away. Sump should be filled with filter media. A schematic diagram of recharge shaft is shown in Fig 10
rain water harvesting methods by us government
Fig 10 : Schematic Diagram of Recharge shaft


f) Recharging of dug wells

Dug well can be used as recharge structure. Rainwater from the rooftop is diverted to dug wells after passing it through filtration bed. Cleaning and desalting of dug well should be done regularly to enhance the recharge rate. The filtration method suggested for bore well recharging could be used. A schematic diagram of recharging into dug well is indicated in Fig 11 shown below.
international methods of rain water harvesting technique
Fig 11: Schematic diagram of recharging to dug well

g)Recharge trenches

Recharge trench in provided where upper impervious layer of soil is shallow. It is a trench excavated on the ground and refilled with porous media like pebbles, boulder or brickbats. it is usually made for harvesting the surface runoff.

Bore wells can also be provided inside the trench as recharge shafts to enhance percolation. The length of the trench is decided as per the amount of runoff expected.

This method is suitable for small houses, playgrounds, parks and roadside drains. The recharge trench can be of size 0.50 to 1.0 m wide and 1.0 to 1.5 m deep. A schematic diagram of recharging to trenches is shown in Fig below 12.
mettur dam hd videos and images
Fig 12: Recharging to trenches

h) Percolation tank

Percolation tanks are artificially created surface water bodies, submerging a land area with adequate permeability to facilitate sufficient percolation to recharge the groundwater. These can be built in big campuses where land is available and topography is suitable.

Surface runoff and roof top water can be diverted to this tank. Water accumulating in the tank percolates in the solid to augment the groundwater. The stored water can be used directly for gardening and raw use. Percolation tanks should be built in gardens, open spaces and roadside greenbelts of urban area.

Important Useful Links:

Useful Links:

Mettur Dam Water Level Today

Mettur Dam Water Level History

Tourism in Mettur Dam

About Mettur

About Mettur Dam

Mettur Dam History

About Diabetes and Treatments

List of Important Government Websites

How to Increase Bike Mileage

Importance of Insurance

Major Reserviors in Tamilnadu

Tamil units of Measurements

Methods of Rain Water Harvesting

Mettur Park Timings

Arulmigu Padrakali Amman Temple Mecheri

Tourist Places in Mettur

About Dengue Fever

Contact Us


Read More

Tuesday 27 March 2018

Mettur Dam Park Timings | Mettur Dam Park Photos

1 comment

Mettur Dam Park Timings is Fixed in all Week Days to visit Mettur Park inside. 

Mettur Dam Park
Mettur Dam

  • Mettur park Entrance Ticket Price is Rs.5 only. Mettur Park Visitors allow to visit from 9AM to 6PM in All week days.
  • All Type of Vechicles Parking Available.
  • Mettur Park is Located in Exact Front of Mettur Dam.
  • Inside the Mettur Park You can see More Flowers and Gress Across Park. 
  • Many Places is there to Sit and Getting Relax and Playing in Various Games for Childerns.
  • Canteen available inside the Mettur Park. 
  • In front of the Mettur Park Gate you can see many Fish Food Shops.. if you like you can taste it.
In this post we are displaying some Mettur Park Photos:
  • Mettur Fish one of the Most Important Food for Touristors.
mettur fish types
Mettur Fish

  •  Nandhi Silai in Mettur Dam - is Located in Pannavadi Parisal Thurai Area.

Metttur Nandhi Silai in Pannavadi Parisal Thurai
Pannavadi Parisal Thurai

  •  Mettur Dam Top View

Metttur Nandhi Silai in Pannavadi Parisal Thurai
Mettur Park Images

  •  Inside Images of Mettur Park

Mettur Park Images
Mettur Park Images

Mettur
Mettur Dam

Mettur Diary
Mettur Dam

Mettur Fish Price
Mettur Fish

Mettur Park Timings
Mettur Park

Mettur Park Photos
Mettur Park Photos


Mettur Park Inside Images
Mettur Park Inside

Mettur Park Videos
Mettur Park

Mettur Park Inside View

Mettur Park Inside View
Park Way


Mettur Park in Tamilnadu
Mettur Park

16 bridge mettur
Mettur 16 Bridge

Mettur dam HD Images
Mettur Dam View

Mettur Park
Mettur Park

Mettur News
Mettur Park in Salem DT

mettur official informations
Mettur Dam Details


Useful Links:

Mettur Dam Water Level Today

Mettur Dam Water Level History

Tourism in Mettur Dam

About Mettur

About Mettur Dam

Mettur Dam History

About Diabetes and Treatments

List of Important Government Websites

How to Increase Bike Mileage

Importance of Insurance

Major Reserviors in Tamilnadu

Tamil units of Measurements

Methods of Rain Water Harvesting

Mettur Park Timings

Arulmigu Padrakali Amman Temple Mecheri

Tourist Places in Mettur

About Dengue Fever

Contact Us


Read More

Tuesday 20 March 2018

Arulmigu Badrakali Amman Temple in Mecheri

Leave a Comment


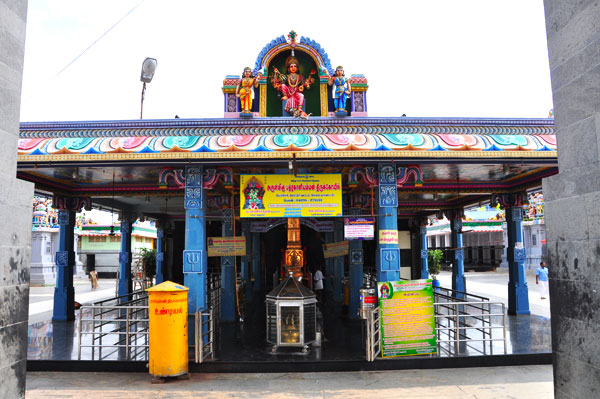
Mecheri - Badrakali Amman Temple was build around 800 years prior by the Tamilans. 


Mecheri is Sourrounded by the lake and beatiful green knolls. It is additionally encompassed by south vallattu nadu and thoppaiyam. Mechari which is well known for "Mecheri exceptional sheep" is the heavenly place for ambigal Bhadrakali who showers her approval all in all universe.
Arulmigu Badrakali Amman Temple in Mecheri
Arulmigu Badrakali Amman Temple - Mecheri

  • Mecheri is Mettur Taluk in Salem District.
  • Mecheri Arulmigu Badrakali Amman Temple is Situated in Heart of the Town in Mcheri.
  • Mecheri Pincode is 636453.

  • Mecheri Arulmigu Badrakaliamman Temple Official Website lik is click here

Reach Mecheri Badrakali Amman Temple via Google Map:


Mecheri Badrakaliamman Temple Images:

mecheri
Speacial Days

Mecheri Badrakaliamman Temple Work ship times

  • Mecheri Badrakaliamman Temple Opens Every day from 05:30 A.M to 08:00 P.M without any break of time. 
Details of Mecheri Badrakaliamman Pooja Times
  • There are two-times pooja in this temple. 
  • The morning pooja is conducted at 05:30 A.M to 07:30 A.M. 
  • The evening pooja is conducted at 05:30 P.M to 06:30 P.M.

mecheri videos
Official Informations from Official Site

mecheri arulmigu badrakaliamman temple photos
Mecheri Badrakaliamman Temple Kopuram


Mecheri Vada Badrakaliamman Temple in Salem District
Badrakaliamman Sirpam

  
Badrakaliamman Temple photos


Badrakaliamman Temple photos


how to reach mecheri badrakaliamman temple
Badrakaliamman Temple photos

Mecheri Badrakaliamman Temple Entrance Images
Mecheri Badrakaliamman Temple Entrance

Mecheri Badrakaliamman Temple Entrance Images
Badrakaliamman Temple Full View

Mecheri Badrakaliamman Temple Inside Images
  • The sanctuary confronting north/is arranged in south - east heading in the core of mechari town adjacent Salem-Dharmapuri highway.There are wide corrifors and mandapams encompassing the temple.Rajagopuram is fundamental access to the temple.Besides this,there are three rajagopurams in three ways. 

  • Extraordinary pooja is performed and the god decorated each thesday,friday and sunday and on full moon and new moon days.On the above days large number of aficionados throng the sanctuary to satisfies their pledges and to make their offerings, from first light to sunset. 
  1. Mettur to Mecheri Distance : 21.5 km
  2. Salem to Mecheri Distance : 30.6 km
  3. Dharmapuri to Mecheri Distance : 41.6 km
  4. Erode to Mecheri Distance :  72 km 
  5. Chennai to Mecheri Distance : Via Vellore 344 km / Via Villupuram 380 km
  6. Coimbatore to Mecheri Distance : 175 km
  7. Trichy to Mecheri Distance : 213 km
  8. Madurai to Mecheri Distance : 258 km
  9. Kanyakumari to Mecheri Distance : 512 km
  10. Bangalore to Mecheri Distance : 210 km


Useful Links:

Mettur Dam Water Level Today

Mettur Dam Water Level History

Tourism in Mettur Dam

About Mettur

About Mettur Dam

Mettur Dam History

About Diabetes and Treatments

List of Important Government Websites

How to Increase Bike Mileage

Importance of Insurance

Major Reserviors in Tamilnadu

Tamil units of Measurements

Methods of Rain Water Harvesting

Mettur Park Timings

Arulmigu Padrakali Amman Temple Mecheri

Tourist Places in Mettur

About Dengue Fever

Contact Us


Read More

Saturday 17 March 2018

List of Fly Ash Bulkers Manufacturers in Mettur | Best Cement & Ash Bulkers Manufacturer in Salem District

1 comment
In this Post We Collect and Displaying List Of Top Leading Fly Ash Bulker Tank Manufacturers in Mettur Areas. and Also we collect One of the Best Cement Bulker Manufactures List in Mettur and Salem District Places.


Note: Before Reaching Manufactures Places once Verify it.
Best Fly Ask Bulker Manufactures in Mettur
Mettur Bulker Manufacture List

After Burned Coal in Thermal Power Plant We Get FlyAsh and Wet Ash.

What is the Use of Fly Ash?

"Fly Ash is a byproduct of coal-fired electric generating plants"
eg: Mettur Thermal Power Station

The most common use of fly ash is as a replacement for portland cement used in producing concrete. Concrete made with fly ash is stronger and more durable than traditional concrete. Fly ash concrete is easier to pour, has lower permeability, and resists alkali-silica reaction, which results in a longer service life.

Fly Ash is used in the following applications, in addition to:

  • Ready-mix concrete
  • Concrete block & pipe
  • Cement manufacture
  • Mineral filler for asphalt roads
  • Soil stabilization
  • Structural fill
  • Waste stabilization/treatment
  • Specialty applications..,ertc
Read Full Post you can Get Informations about, List of Major Fly Ash Bulker Tank Manufactures in Mettur and Salem District.


What Is Fly Ash?

Fly ash is one of the naturally-occurring products from the coal combustion process and is a material that is nearly the same as volcanic ash. Volcanic ash concrete was used thousands of years ago to produce Roman concrete structures that exist and function today; e.g., the Pantheon, Coliseum, and ancient aqueducts. When coal is burned in today’s modern electric generating plants, combustion temperatures reach approximately 2800°F. The non-combustible minerals that naturally occur from burning coal form bottom ash and fly ash. Bottom ash is a light-weight aggregate material that falls to the boiler bottom for collection. Fly ash is the material that is carried off with the flue gases, where it is collected and can be stored in silos for testing and beneficial use classification.

How Is Fly Ash Used?

The most common use of fly ash is as a partial replacement for portland cement used in producing concrete. Replacement rates normally run between 20% to 30%, but can be higher. Fly ash reacts as a pozzolan with the lime in cement as it hydrates, creating more of the durable binder that holds concrete together. As a result, concrete made with fly ash is stronger and more durable than traditional concrete made exclusively with portland cement.

How to Transport Fly Ash From One Place to Other Places:


 Well, Nice Question you Thinking About it..!!!

Fly Ash can transportining with help of Fly Ash Bulker Tanks from one place to other places. 
Why Use Fly Ash?

Fly ash concrete has increased strength and durability, which means it can handle greater loads, is more resilient and lasts longer. Fly ash concrete can withstand harsher service environments than straight portland cement concrete. It is less susceptible to chemical attacks (de-icing salts, soil sulfates, etc.) and mitigates the negative impact of deleterious aggregates. This is especially true when using fly ash in infrastructure projects, such as roads, highways and bridges. 

Fly ash concrete is easier to work with because of its spherical shape and its ability to moderate early concrete set time. The improved flowability, reduced hydration temperatures and delayed setting time of fly ash concrete are the main factors that contribute to ease of placement of concrete. Fly ash concrete also has lower permeability than traditional concrete, which means less water and chemicals can enter the concrete. Therefore, fly ash concrete has a longer service life and doesn’t need to be repaired or replaced as often. Some states require the use of fly ash concrete to prevent premature deterioration. Fly ash is used to mitigate a problem called alkali silica reaction, which occurs when concrete deteriorates early due to issues with aggregate quality. This is a major issue for some states, and fly ash is the product most widely-used to combat this problem.

Fly ash concrete costs less. Depending on what area of the country you are in, fly ash can be 20% to 60% less expensive than portland cement. In some cases, portland cement can be more than twice as expensive. However, there have been few instances where fly ash was shipped long distances and sold for higher prices than local portland cement because the concrete durability requirements could only be met using fly ash.

The use of fly ash has positive environmental impacts, as it conserves landfill space, reduces energy and water consumption, and helps reduce greenhouse gases. The use of fly ash displaces portland cement production, which emits approximately one ton of CO2 for every ton of cement produced; i.e. for every ton of fly ash used, CO2 emissions are reduced by one ton. According to a National Conference of State Legislatures’ Briefing Paper entitled Recycling Fly Ash, “If all the fly ash generated each year were used in producing concrete, the reduction in CO2 emissions would be equal to eliminating 25% of the world’s vehicles.”

Is Fly Ash Safe?

Fly ash has similar chemical composition to that of portland cement, shale and volcanic ash. Similarly to these materials, fly ash contains naturally occurring trace elements that are also found in rock and soils. These trace elements are present in parts per million (mg/kg) levels and they account in total for less than 1% of fly ash. The levels of these trace elements in coal ash are similar in concentration to background levels in naturally occurring U.S. soils. In beneficial use applications, such as incorporating fly ash in hardened concrete, exposure would be far less than that assumed for residential soil and the potential risks would be below levels of concern.

Major Advantages of Fly Ash:

  • Fly Ash For Concrete Better Performance Without Higher Cost
  • Weighr Less
  • Low Cost
  • Easy to Getting from Local Areas.
  • Less Polution and Others..
  •  Easy to Transport with help of Fly Ash Bulker Tank Vechicles.
Important link:
  • Bulker Tank Manufacturer in Mettur
  • Fly Ash Bulker Manufacturer List in Mettur
  • Cement Bulker Design and Manufacturers in Mettur 
  • Mettur Bulker Design and Manufacturer Contact Numbers

Useful Links:

Mettur Dam Water Level Today

Mettur Dam Water Level History

Tourism in Mettur Dam

About Mettur

About Mettur Dam

Mettur Dam History

About Diabetes and Treatments

List of Important Government Websites

How to Increase Bike Mileage

Importance of Insurance

Major Reserviors in Tamilnadu

Tamil units of Measurements

Methods of Rain Water Harvesting

Mettur Park Timings

Arulmigu Padrakali Amman Temple Mecheri

Tourist Places in Mettur

About Dengue Fever

Contact Us


Read More